
Disc Thickness Variation, DTV is a variation in thickness of the disc rotor braking surfaces as it rotates on the axle. The hydraulic pressure behind the caliper pistons force the brake pad to maintain consistent load on the rotor surface.
When the thickness of the disc rotor varies by as little as 20 microns, the pads oscillate back and forth causing a pulsation in the hydraulic circuit back to the brake pedal.
This brake pad oscillation also causes a variation in brake torque as the brake pads grab and release over the higher portion of the rotor thickness. This is typically noticed in the steering wheel as the brake torque from the left and right axles is different and out of sequence.
Brake pad material deposits are often mistaken for DTV. The key differences to be observed are:
Worn or damaged suspension bushes can also simulate the vibrations associated with DTV, as the loose suspension assembly oscillates back and forth under braking.
DTV is the end result, with many causes behind the generation of this issue. A few of the more common causes resulting in DTV are:
Once DTV is correctly identified, disc rotors may be repaired by means of re-machining only, but only if adequate material is remaining on the disc rotor surfaces.
Note that mechanical or fitting issues must be addressed to eliminate re-occurrences.
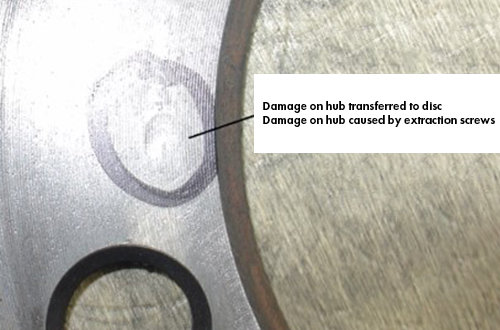
Ultimately extreme damage or mild, will eventually have the same result and taking care when removing the discs is paramount. More importantly check the discs. This cannot be stressed enough.
The best result will come if you
In doing so if there is any damage it will be covered by the 8 mm hole and not cause the disc to run out.
Remember - Not cleaning debris from the hub and inspecting for extraction screw damage before installation can be a root cause.
This article is brought to you by Mechanic.com.au Premier Community Partner DBA
