
The following steps are recommended to ensure the best possible results after fitting a hat type disc rotor:
1. Remove wheel.
2. Remove brake pads and push caliper piston back. Start by first loosening the bleeder so as not to push contaminated fluid into the system. Check caliper condition e.g. slides are not stiff or worn.
3. Remove caliper from its supports without disconnecting brake line, making sure to secure it without letting it hang.
4. Remove old brake rotor.
5. Check hub bearings for wear, replace as necessary (refer to the vehicles manual for exact specifications).
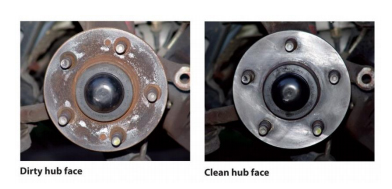
6. Remove any scale or grit off hub face to ensure positive contact with the inside of the new rotor.
7. Fit new disc rotor to hub making sure it is indexed to a point with minimum run-out (using a radial dial indicator).
8. Refit brake caliper.
9. Clean any grease or foreign material off the rotor with Brake Cleaner.
10. Select correct brake pads to suit the style and driving conditions of the driver and vehicle.
11. Check brake fluid condition and replace as necessary. Do not flush dirty fluid through the system, remove dirty fluid from reservoir first.

12. Refit wheel, tightening wheel nuts in correct sequence and to recommended torque settings.
13. Carry out road test and bedding-in procedure. Refer to brake pad manufacturer’s bedding in procedure.
14. Ensure vehicle owner understands that the rotors will take approximately 300km to bed-in.
