
The most important part of any clutch system repair begins with the initial diagnosis.
The primary cause of complaint must be identified correctly, along with any secondary or related concerns, prior to replacing or repairing any components.
For example: a clutch might be slipping because it is old and excessively worn, but this phenomenon may also occur for many other reasons (such as grease or oil contamination, release mechanism problems, driver error/abuse, or an incorrect flywheel profile).
If the initial diagnosis is not correct, then, despite repair work having been carried out, the vehicle will still be in a state of disrepair. The inevitable consequence of which is usually the premature failure of the replacement clutch.
EXEDY Australia always recommends following vehicle manufacturers’ individual clutch installation instructions, unless the kit selected requires a different procedure, in which case any special instructions required will be provided within the kit.
As with most things in life, prevention is better than cure, so here are the top three installation errors we encounter, along with sure fire ways to avoid them.
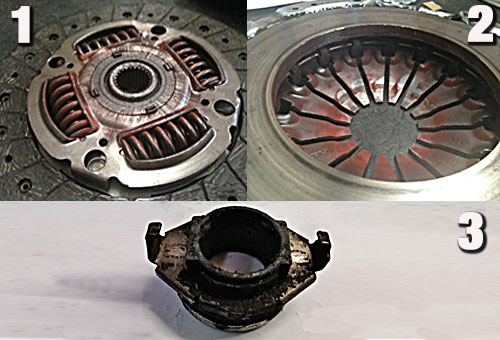
1) Incorrect Or Excess Grease Applied During Installation
This is a very easy mistake to make, which can result in contamination of the friction surfaces, leading to the clutch slipping and/or juddering. Simply apply a small amount of suitable high melting point grease to the input shaft, the splined hub, the fork (where it contacts with the release bearing) and the fork pivot surface. Slide the friction disc onto the input shaft then wipe off any excess grease before completing installation. EXEDY Australia includes a tube of high melting point grease with every clutch kit purchased.
2) Misalignment Of The Engine And Transmission
This can occur for various reasons, including: hanging the gearbox during installation; forcing the gearbox input shaft during installation; a worn or missing pilot bush (spigot bearing); warping of an alloy gearbox bellhousing; damaged or missing gearbox dowel pins; interference between the gearbox and engine mating surfaces caused by dirt or grease accumulation, metal chips, or even by wiring and pipework clips.
To avoid this, it is important to degrease and inspect the gearbox bellhousing thoroughly, ensure a transmission jack is used correctly, and use the relevant clutch alignment tool during installation.
3) Release Bearing Installation and Release Mechanism Faults
It can be very easy to overlook installation errors or incorrectly assume that there are no problems present in this area. Thoroughly inspect the gearbox bearing guide tube, the fork or lever and the cable or hydraulics system for any wear or visible faults.
Always follow vehicle manufacturers’ recommendations when adjusting or replacing the bearing, the cable or any hydraulics components. Check for any clutch travel adjustment required upon clutch replacement. This may be necessary dependent on the vehicle.
If you encounter any problems or are unsure about any of the above, seek advice before proceeding further.
Most vehicle manufacturers will have a technical hotline you can contact for advice or you can contact your local EXEDY office for assistance.
This article was shared with the Mechanic.com.au Community by our Premier Community Partner Exedy
