In two previous articles titled Lead-acid Battery Analysis and Management for New Mechanics Parts 1 and 2, we discussed some aspects and principles of lead-acid battery operation. We also looked at some aspects of normal flooded lead-acid battery operation that can sometimes cause what might appear to be battery defects and/or failures, but what are in fact, normal, and expected effects of the working principles and physics of flooded lead-acid battery operation.
In practice, though, it is not always easy to distinguish between naturally occurring phenomena such as, say, self-discharge and actual battery defects, and sometimes, you require hugely expensive high-end tools that use complex AI-derived algorithms to make such a distinction. However, if you are new to the car repair industry, you probably don’t own or have access to such specialised and hugely expensive tools but despite this, you can do several meaningful battery tests with tools that you likely already own or if you don't, with tools that don’t cost much. Thus, in this article, we will discuss some of these tests, so let us look at-
Before we get to specifics, it should be noted that even high-end battery testing tools often produce inconclusive or misleading test results if they are not used correctly. Moreover, learning to interpret test results obtained with some tools correctly often involves climbing a very steep learning curve, but the few basic battery tests we will discuss here are easy to perform and their results are usually definitive and not open to misinterpretation. With that said, let us look at some battery tests that you can perform with tools that do not cost an arm and a leg, starting with-
Although batteries are (as a general rule) not considered ideal sources of voltage, some useful inferences about a battery’s state of health can nevertheless be made when measuring the voltage that a battery produces. However, it is important to keep a few things in mind when performing this test with a multimeter, including the following-
As a practical matter, the best time to measure a battery's voltage is after the battery has rested for at least eight hours (with no loads on it) because the chemical reactions that charge/discharge batteries take several hours to reach a rough point of equilibrium.
In addition, since each cell in a flooded lead-acid battery has a capacity of between 2.12V and 2.15V, depending on the battery type, size, and the battery’s temperature, an ideal reading across the poles would be between 12.6V and 12.9V. At this value, the battery can be considered healthy and fully charged, but note that valve-regulated (sealed) flooded lead acid batteries often produce readings of up to about 13.0V when fully charged.
Also, bear in mind that the voltage difference between a fully charged battery, and an effectively discharged battery is very small. For instance, most lead-acid batteries that read 12.4V are around 50 per cent discharged, while most lead-acid batteries that read 12.0V are effectively flat and will typically not start a modern vehicle.
If a battery’s source voltage is below the generally accepted value of 12.6V for a fully charged battery, checking the specific gravity of each cell might reveal one or more causes for the low voltage.
WARNING: While this test can yield extremely valuable diagnostic clues about a battery’s state of health, it should be borne in mind that removing the seal that prevents tampering on sealed batteries can void the warranty on that battery if it is still covered by warranty.
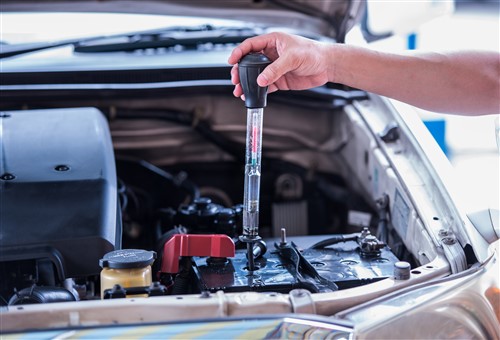
If there is no warranty in place and the cell caps can be removed, use a hydrometer to check the specific density of the electrolyte in each cell. While it is helpful to have the specific density values for a particular battery at hand, what you are looking for is significant differences in the density of the electrolyte between cells since the chemical processes that charge/discharge each cell have a direct effect on the density of the electrolyte in each cell.
It should be noted that while all battery hydrometers have a graduated or coloured scale against which the density of the electrolyte is measured, these scales are generally not very accurate. However, you will usually not be looking to measure the absolute density of the electrolyte; you will be looking to see if the electrolyte's density is the same or very close to the same in all the cells. If the electrolyte’s density is the same across all the cells, the battery is usually good and can in most cases, it should be possible to recover the battery simply by recharging it.
As a practical matter, the density of the liquid electrolyte decreases progressively as a battery discharges until the electrolyte is almost pure water when a battery is completely discharged. Therefore, the weighted float in a hydrometer will ink deeper into the sample of electrolyte (that is drawn into the instrument) that it would have if the battery is discharged than it would if the battery is charged, and the density of the electrolyte is higher.
However, if you do find that the electrolyte's density varies between cells, it means that some cells are charging/discharging more than other cells. This typically means that the affected cells are a) damaged and b) that the damaged cells can invariably not be restored to a healthy state.
Note that while electrolyte density variations between cells are most often caused by internal battery defects such as short circuits between plates or low electrolyte levels in the affected cells, it is sometimes possible for defective charging systems to damage individual cells in old or cheap, low-quality batteries that abound on online retail platforms.
The most useful test you can do with a multimeter if you don’t have access to a carbon pile tester is to check the battery’s power output when it is subjected to a high load, such as when the starter cranks the engine.
The object of this test is to see if the battery can deliver the short but intense burst of power required to crank and start the engine without the battery's voltage dropping to below a critical level. As a practical matter, this test is also useful to assess the battery's reserve capacity, which is a measure of a battery's ability to deliver a specified voltage over a fixed period. Here is how to do this test-
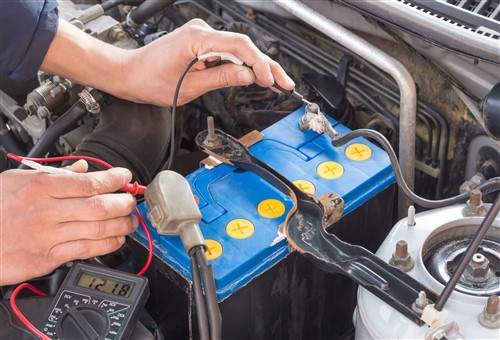
Make sure that there are no loads on the battery, and connect the positive lead of the multimeter to the positive terminal, and the meter’s negative lead to the negative terminal. Have an assistant start the engine while you observe the meter: if you are quick about it, you’ll see the meter display a minimum voltage as the engine cranks.
NOTE: Old-style analogue multimeters work well for this test since the refresh rate of digital multimeters is often too slow to show an accurate reading before the engine starts.
Ideally, the minimum voltage should not drop below about 10V; if it does, the battery should be tested further with proper diagnostic tools to determine its state of health definitively. Nonetheless, this test is valuable as a screening test, even if you do not have access to high-end diagnostic tools to test other parameters of a battery’s state of health.
Of course, there are more efficient ways of conducting this test, so consider the image below-
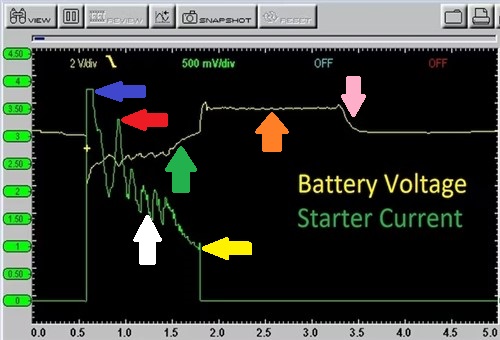
This image is an actual oscilloscope capture that allows one to visualise the flow of electricity through the starter motor when a vehicle is started. There is a lot of information in this capture, so if you have not seen such a capture before here is what the arrows mean-
So, while it is possible to obtain some useful information about a battery's state of charge, as well as its state of health by using a multimeter to perform current draw tests, the information obtained in this way is very limited compared to doing the same test with an oscilloscope, as shown here.
We realise that oscilloscopes and software that can turn laptop computers into oscilloscopes are expensive. Nonetheless, we hope that the example of what an oscilloscope can tell you, as shown here, will inspire you to invest in at least some advanced diagnostic equipment (such as an oscilloscope) that will allow you to see the details of current flows in systems and components in (almost) real-time. This is a particularly important point from a diagnostic perspective because these details cannot be obtained and/or observed in any other way, which brings us to -
You may be surprised to learn that a large percentage of premature battery failures in modern vehicles occur as the result of the charging system not recognising the chemical properties of a new battery, which begs the question of how seemingly identical batteries can be different from each other.
This is a very good question, but the problem does not involve manufacturing differences between new batteries of the same (or even different) brands as much as it involves differences in the chemical properties that exist between new and old batteries, regardless of the brands of the batteries involved.
There are many reasons why a battery's internal chemical make-up changes over time, but the most important factor that determines how, and by how much a battery's performance changes as a result of chemical changes [in the battery] involves the depth of a battery's charge/discharge cycles. Put differently, this means that the performance of some batteries will deteriorate faster or slower than the performance of others, depending on how the battery is used, as well as how well (or otherwise) it is maintained.
We need not delve into the intricacies of how charging systems distinguish between an old battery and a new, replacement battery here. Nonetheless, suffice it to say that unlike old-style charging systems that delivered a constant charging current regardless of the condition of the battery, or the electrical loads on the battery, sophisticated power control modules in modern vehicles can adapt an alternator’s output to suit both the loads on the battery and the condition of the battery.
In practice, this means that when a battery is fully charged or nearly fully charged and the loads on the battery are low, a modern charging system will deliver what amounts to a floating charge current that requires much less effort from the engine to maintain. So, instead of delivering a constant and continious 14.2V charging current, the output of a modern "smart" alternator can vary from 0V to about 14.6V, depending on both the battery type, the battery’s overall state of health, and the loads on the battery at any given time.
However, as a battery ages, a smart alternator will adapt its output strategies to accommodate the changes in how the battery accepts a charging current to ensure that the battery's performance meets the minimum requirements of voltage-sensitive electronic systems and components at all times.
This means that if a new battery is not integrated into the vehicle’s larger electrical system, or more accurately, into the vehicle’s charging system, one of two things can happen as a result of the alternator applying its learned output strategies to a new battery that it does not recognise.
The first thing that could happen is that the alternator may chronically undercharge the battery, which could and often does cause a wide range of symptoms- apart from premature battery failure as a result of excessive sulphation. The second thing that could happen is that the alternator may chronically overcharge the new battery, which could and often does cause the failure of voltage-sensitive systems and components as well as premature battery failure as a result of the battery overheating continuously.
Few mechanics will commission a replacement battery without integrating it into a vehicle’s electrical system with a suitable and capable scan tool. However, many car owners replace the batteries in their vehicles on a DIY basis, generally or frequently not knowing that the new battery must be “introduced” to the charging system to ensure the new battery’s optimal performance over its expected lifetime.
As a practical matter, using a capable scan tool to see whether (or not, as the case may be) a new battery has been integrated into the vehicle's electrical system should be the first step in any diagnostic procedure that involves a premature or unexplained battery failure in modern vehicles.
As mentioned elsewhere, failing to integrate a battery into a vehicle’s electrical system correctly is often the root cause of many types of failures or malfunctions in many electrical systems. Therefore, battery integration, or verifying that a battery had been integrated is now a required step in the battery service/replacement procedures in almost all vehicles that are less than about six years old, which leaves us with this-
We hope this and the two previous articles have given you some new and useful insights into how flooded lead-acid batteries work and why they fail. More to the point, though, we hope these articles have adequately illustrated the point that you do not necessarily need an arsenal of expensive diagnostic equipment to perform basic battery testing.
By using some basic equipment and your knowledge of how flooded lead-acid batteries work, you should be able to distinguish between merely discharged batteries and damaged or defective batteries as the root cause of many electrical issues, which, if you get this distinction right, means that half the diagnostic battle is won.