
If you are an experienced technician, you probably know that pulling fuses and interrupting electrical circuits in a random fashion can cause severe issues with KAM (Keep Alive Memory) programming on some applications. If however, you are new to the car repair trade, or have not had much exposure to electrical diagnostics, you should know that losing or corrupting the KAM memory and/or other vital programming has the potential to cause far more serious issues than the problem(s) you are trying to diagnose and fix.
In addition, you should also know that several control modules on a modern vehicle keep on communicating with several other control modules via the serial bus communication system for a good long while (up to several hours, in some cases) after the vehicle is switched off. In fact, some modules such as for instance, those that control the clock, security/anti-theft system, and some parts of the ECU never stop communicating, and these modules and their associated circuits will continue to be “live” while battery power is present.
This means that if you start pulling fuses in a random fashion while having a multi-meter connected across the battery poles in an attempt to find a parasitic current drain, you run the real risk of isolating large sections of the CAN bus system, which in turn, means that you could be isolating a section of the electrical system that contains the cause of the parasitic power drain.
So if interrupting circuits by pulling fuses is a bad idea, how does one find the cause of a parasitic power drain? The short answer is that there are several ways of going about it, but the purpose of this article is to describe one method that does not cause additional issues, so let us start by breaking the problem up into more manageable pieces, the first of which is to-
If the vehicle had not been running for several hours, there is an excellent chance that you may find codes relating to low system voltages and while this is to be expected, what you are really looking for is codes that relate to short circuits in general, but short circuits to battery positive, in particular.
Note though that these types of codes do not always set, but when they do, they are valuable diagnostic aids since these codes will point you in the right direction in the sense that they refer to specific systems, or alternatively, to specific parts of the CAN bus system that are most likely to contain the site of the issue.
Unfortunately, you will not always have trouble codes to help you out, so when this happens, you can follow the following steps-
In most cases, you will have a partially drained battery, so the first thing to do is to bring the battery up to a full charge. Be sure however to use a memory saving device if you have to disconnect the battery at any point to protect the KAM and/or other programming.
Once the battery is fully charged, do the following-
Open and latch all the locks
The reason you have to do this is to complete all the circuits that would normally be completed when the doors are closed. Bear in mind that you are going to try to find a parasitic battery drain, which you cannot do when some circuits are not completed. This step should also include latching the boot lock, as well as the bonnet catch. Latching the locks is easy; just push the locks closed with a screwdriver.
You will also want to tape all the interior light switches closed, which you can do by sticking a piece of duct tape or similar over the switches in the door jambs. As an added precaution, you can also close all the windows. At this point, you need to check the dashboard for any warning lights that may indicate that one or more locks are still open. If you have such a warning light despite having manually latched all the locks, it is more than possible that the defective latch is the cause of the current draw, so fix all known issues first before proceeding.
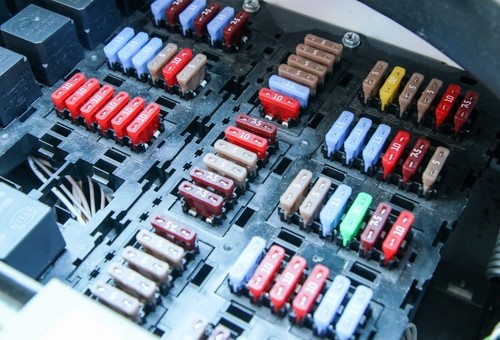
Locate all the fuse boxes
As you may or may not know, many modern vehicles have multiple fuse boxes, so be sure you have located them all to be sure you can check every single circuit on the vehicle.
Let the vehicle go to sleep
Note that it can take several hours for some vehicles to go to sleep, in the sense that only the circuits and control modules that would normally be powered up to maintain critical functionalities and programming are energised. However, it is not always easy to determine which circuits should always have power, so it helps to have access to service information that lists or indicates these circuits. These would typically include the clock, parts of the ECU, the security/anti-theft system including keyless entry systems, etc.
Once you have identified these circuits, locate the fuses and/or fusible links that protect them, and mark these fuses in some way, such as by sticking a narrow strip of insulation tape over them. You will be surprised by how many circuits remain energised on some vehicles, but by marking these fuses, you can save yourself a lot of time by initially concentrating your efforts on the circuits that should not be energised.
As mentioned elsewhere, you need to let the vehicle go to sleep, so the best thing to do now is to wait a couple of hours, or if circumstances allow, letting the vehicle sit overnight before you start, but make double sure the ignition remains in the “OFF” position, or better yet, that the key is not in the ignition-
So, assuming that the battery’s state of charge is still above about 95% when you are ready to begin, start the process by checking that your multi-meter is in good working order by setting it to “?”, and touching the probes together. If you get a reading of about 0.1 to 0.2 ?, you are good, but if the reading is higher or fluctuates when you wiggle the probes, you need to replace the leads before continuing because you will get false readings and test values if you don’t use good leads.
However, before you start to actually test circuits, you need to know how to interpret the results of your checks, but fortunately though, you don’t need to know how much current each circuit in the vehicle should carry. The only important factor here is that some circuits should not have any current at all, so if you do find a current in a particular circuit, there is a good chance that you have found the source of the parasitic current draw, or at least, that you have identified the circuit that contains the problem.
Nonetheless, there are a few things to keep in mind when doing the tests; for one thing, it is very likely that you will obtain a voltage reading across most fuses. This can be confusing, so allow about 5 seconds or so for the reading to stabilise; if it drops down to zero within this time, the circuit is good, but if the reading persists for longer than about five seconds or so, there is a current in the circuit that should not be there.
Having said all of the above, there is one other thing you need to do, which will be enormously helpful during this process. Consider the image below-
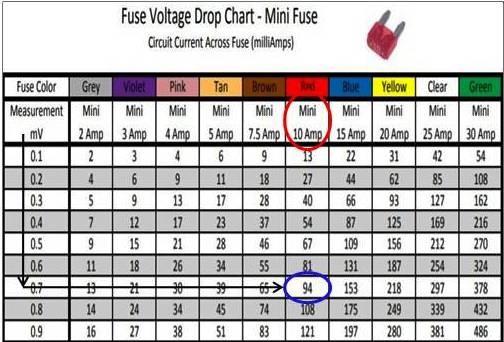
Source: www.powerprobe.com
This image is a partial screen shot of a chart that lists the relationship between millivolts and milliamps, and which is freely available and downloadable from https://www.powerprobe.com/fuse-voltage-drop-charts. Let us look at this example in more detail-
In this example, the different colours and capacities of standard, or maxi fuses are arranged along the top (other charts are available for other types of fuses). The extreme left column lists millivolt readings, while the vertical columns under the fuse colours list values in milliamps. The lines and circles in this chart were added by this writer for illustrative purposes.
So when you are ready to start, set your multi-meter to the millivolt scale, and start checking fuses by touching a lead to each open metal contact on the fuses, but do NOT pull the fuse. So let us imagine that after some testing, you have found a current of 0.7 millivolt (as shown by the arrow in the left-most column) in a circuit that is protected by a 10-amp fuse. Now move across to the 10-amp fuse column: where the horizontal arrow intersects the 10-amp column you will see a value of 94 (circled in blue), which is the current across the fuse expressed in milliamp.
Off course, you still don’t know where the actual problem is, but knowing the parasitic current value in milliamps does have some diagnostic value. For instance, a value of 94 milliamps is very small, and therefore, unlikely to be the result of a major short circuit that has the potential to melt wiring, meaning that this example value is more likely to be the result of some power leakage across or between terminals in a corroded or dirty electrical connector.
Thus, since you know which circuit to inspect based on the fuse number, you can concentrate your efforts on identifying questionable connectors in that specific circuit, as opposed to disconnecting unrelated connectors in a random fashion hoping to stumble across the site of the short circuit by accident, as it were.
Bear in mind though that permanently powered circuits are not immune to short circuits and other issues. So if you don’t find the problem in the circuits that were not marked, take readings of all the circuits that you marked before. It could happen that one or more of these circuits are drawing more current than they should, which you can easily check against the millivolt readings you obtain.
Note though that the values on the charts described above only goes up to about 10 millivolts, so if you obtain a reading of say, 40 millivolts, simply multiply the values by four (or the appropriate factor) to obtain an accurate milliamp value.
While this method of finding parasitic power drains may appear to be cumbersome at first, it does get easier the more you do it. Generally speaking, and after having performed this procedure a few times, it should not take a reasonably competent technician more than about an hour to check all the circuits even on high-end SUV’s that are notorious for the sheer number of fuses they have.
One more word of advice though; resist the temptation to try and find the actual root causes of all parasitic current draws you identify. If you are not an auto-electrician, the greatest advantage of using this method lays in the fact that you can easily confirm the presence of a parasitic current drain that the resident auto-electrician(s) can resolve in-house, as opposed to referring the vehicle to the dealer or a competing workshop.
