Identifying chassis noises and vibrations can sometimes be simple and at other times extremely difficult to pinpoint. In this article we’ll share a number of tips to help make this process easier.
On the workshop floor today, it’s not uncommon to see a number of rubber bush failures such as vertical bushes in lower control arms, causing increased arm movement. Wear to ball joints and tie rods is often more prevalent in heavier vehicles, especially when upgrades are carried out to wheel and tyres due to increased loads on steering and suspension components.
Noticeable wobble issues are often created on heavy vehicles with a solid front axle when greater wheel offsets are installed which magnifies these issues. In extreme cases these wobbles increase with speed putting severe stress on not only tie rods by ball joint mounts, causing eccentric wear.
In heavy vehicles that utilise steering box arrangements lifting can also create scenarios that cause premature wear to pitman arms, steering arms etc. Depending on the kit used to carry out the lift, components are often included to alleviate these problems.
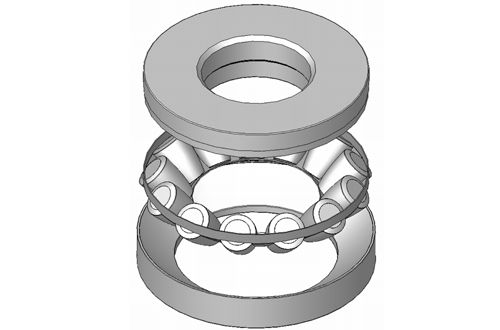
With respect to strut suspension setups, the weakest link is often the upper strut bearing.
Careful attention should be paid to coil spring setups with regards to fatigue and fracturing, more often demonstrated by smalled guage coils, especially where the bottom coil sits in a seat on vehicles that experience salt water from beach runs etc.
On struts that feature a pinch bolt mount at the bottom (as opposed to dual bolts at a flange), strut tubes can bend on hard impacts/rough roads.
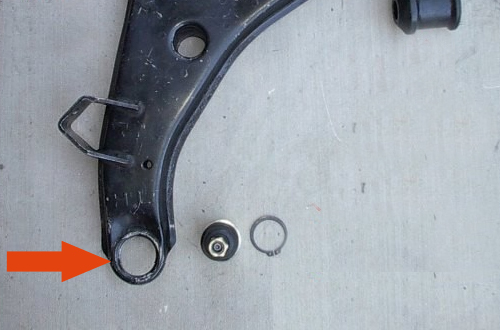
One notable issue that has been brought up lately is increased failure of aluminum steering knuckles and control arms. The softer metal is conducive to tapered bores wearing out-of-round due to improper installation and neglect to correctly service. As the holes wear, the studs move around also and the wear is accelerated. Proper tightening (to OE specifications) is absolutely critical to prevent this.
From a service standpoint, we’re seeing a significant move toward using complete assemblies, as opposed to repairing/rebuilds. Examples include complete strut assemblies, as opposed to dismantling and replacing the damper, and also the coil and the upper bearing. Installing a complete strut assembly has the advantage of everything being brand new and substantially reducing labour time and job turnaround.
The same concept of offering complete assemblies has now expanded to include complete control arms, steering system as well as complete knuckle assemblies that include pre-installed bearings, eliminating the need and time required to press out and replace with new bearings.
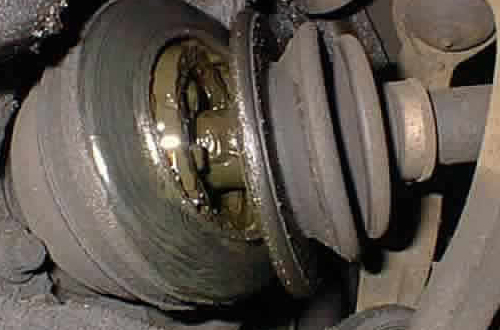
When a CV joint boot is torn or worn open allowing contaminants to enter and grease to exit, the joint will soon fail. As most of us will know, warning signs include a clicking sound, especially during slow turns, which indicates a bad outer CV joint. A rumbling noise/feel is usually indicative of a failing inner CV joint.
Hydraulic engine mounts such as used in Honda applications can wear and begin to experience changes in damping speed, which eventually lead to failure and result in separation.
Rack and pinion steering systems can often develop a mystery leak which may not be visible externally. A slight air leak in the fluid reservoir to the pump circuit may cause air to be drawn into the system on the suction side with no signs of external leakage. If air enters the system, it can’t bleed itself. In order to diagnose this, place a slight pressure to the reservoir using a radiator pressure tester at around 2 psi. While pressurised, look for fluid leaks at hoses and connections.
Wheel bearing issues sometimes don’t exhibit looseness and may feel tight, even though the customer may have noted a strange noise. A handy diagnostic tip is to hold your hand on the coil spring and rotate the wheel by hand. A worn or failing wheel bearing can show itself if you feel a slight vibration through the spring.
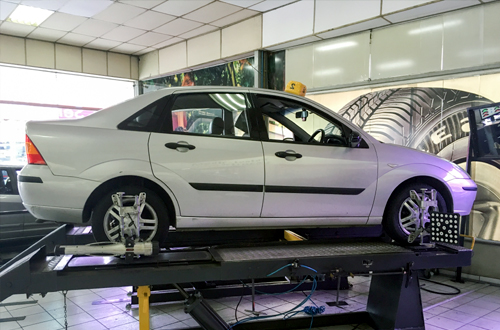
Wheel alignment procedures are changing notably, often requiring additional steps and special precautions, thanks to the proliferation of on-board electronics. For example, on vehicles that feature a steering angle sensor (SAS), when wheel toe is adjusted, on some applications the sensor automatically recalibrates, while on some vehicles a scan tool must be used to reset. Active steering, autonomous braking, long range radar, infrared, cameras, etc. may need to be re-set, especially if the vehicle has been involved in a collision due to sensor alignment angles being misaligned. Wheel alignments are becoming more and more complex due to these extra features. Vehicle manufacturers provide set procedures for vehicles that feature these systems.
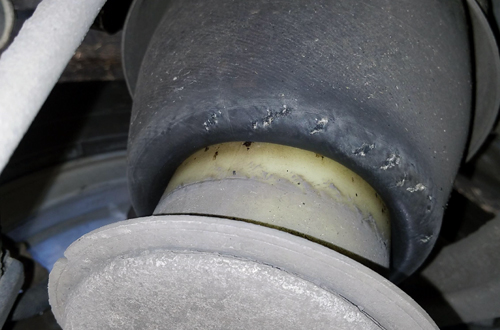
Problems with air suspension systems present a range of unique issues. They are found on many luxury cars and four wheel drives. Air suspension serves the same purpose as a standard coil spring suspension system but instead of using metal springs they use inflatable air springs filled with compressed air to level the vehicle.
Many drivers miss the early warning signs of an air suspension issue and unfortunately these problems only get worse and more expensive as time goes on.
The main signs of a failing air suspension system includes:
Warning Light: One of the obvious signs of an air suspension problem is when an instrument cluster warning light comes on. Even if the light doesn’t stay on, the vehicle should be checked.
Sagging Suspension: One of the first signs of an air suspension problem is when a car sags in a corner or entire side. This is often due to the rubber air spring developing tiny cracks or holes because of dry rubber rot or road debris. If a customer notes that their vehicle drops in height overnight or after they park, they most likely have leaks in their air spring or strut.
Air suspension compressor constantly operating: If there is damage to the air springs then the compressor will be constantly pumping air to keep the air bladders inflated. If the compressor is constantly running, the system should be examined as soon as possible.
Compressor not working at all: The air suspension system can’t function without the compressor. If the compressor does not come on at all, that may be a sign that it was overworked and has burned out or it could be as simple as a fuse or relay problem.
Compressor making noises: The owner may also notice abnormal noises during compressor operation such as loud clicking, whining or grinding. This could be a sign that the compressor has been overworked or there could be excess moisture in the system because the compressors dryer is saturated.
Other suspension issues also may apply to air suspension including:
The vehicle bottoms out over bumps
The vehicle nose dives when stopping.
The vehicle pulls to one side or steering is difficult.
The car continues to bounce after hitting a bump.
Tyre tread wear is uneven
If the customer complains about any of these symptoms or if the vehicle is over five years old or has over 70,000km, you should inspect it for signs of air suspension damage.
If the warning light comes on, but the car seems to be maintaining its height, you should use a scanner to diagnose the fault code. Typically, this is often an electrical problem such as a fuse or relay.
If the vehicle sags at one corner or side the easiest way to diagnose the air suspension problem is to put the vehicle on a hoist and perform a visual inspection of the air struts and springs, ride height sensors, air lines and connections and the compressor. To locate leaks in the air suspension system, spray the air bladders, fittings and lines, and top seal with a leak detection fluid, such as those used to locate AC leaks.
There are multiple options for repairing and replacing a leaking air spring or strut. New springs, struts and compressors are often expensive at dealerships but aftermarket companies offer options that cost far less.
If a vehicle has numerous air suspension problems or has a long history of issues it may be more cost effective to replace the air suspension with a coil conversion kit. Some kits can cost about the same as a single air strut at a dealership but should provide many years of trouble-free service.
The bottom line of this is air suspension repairs are not difficult to diagnose or fix. You should be inspecting these systems after around 70,000km and customers should be encouraged to repair their air suspension problems quickly before one problem turns into more expensive problems.
Ride control, in terms of both handling and noise concerns, are common complaints. In most instances, the customers description is vague or misleading.Try to gather as much information from them as possible prior to performing an inspection.
For example, do you only hear a strange noise when driving on bumpy roads or on smooth roads, as well? If you suspect that the vehicle is heavily loaded at times, ask if the wandering they experience only occurs when heavily loaded etc. The customer’s descriptions of an issue should be considered merely as a starting point. It’s up to you to inspect and road test to determine the actual cause of the complaint.
Prior to any chassis related issue, always begin by checking the basics including tyre size, inflation and vehicle ride height. These basic checks can help to quickly identify contributing factors with regards to directional pull during cruising and braking, as well as wheel alignment issues and potential cause for uneven or premature tread wear.
A directional pull while driving can involve any of a number of issues. Begin by checking tyre size, verifying that both tires on the same axle are the same size. If a previous tyre replacement resulted in only one tyre being replaced of a different diameter, the smaller diameter tyre will cause the vehicle to pull in the direction of the errant side. All tyres should ideally be the same make and model, and overall tire diameter should be the same at both sides of each front and/or rear axle.
Improper inflation pressure is one of the leading causes for a directional pull. Depending on the sensitivity of the suspension design, as little as a 2 psi change per axle side can account for a pull. The pull will occur at the side that has the lower inflation pressure. The severity of the pull will depend on the comparative difference in the same axle’s tires. Tire inflation differential isn’t limited to the front steering axle only. Uneven rear tire inflation can cause a pull as well.
Wheel alignment angles due to suspension and steering component wear can have a significant effect on a vehicles tendency to pull in one direction. This includes toe, camber and caster. Excessive toe-out on one side can cause the vehicle to pull in the direction of side with more toe-out. If camber angles differ, the vehicle will tend to pull in the direction of the wheel that features more negative camber angle.
Brake drag can cause both an accelerated brake pad and rotor wear issue and a directional pull. If the caliper pistons on one caliper do not retract fully (during non-braking or after a braking), the pads can retain enough rotor contact to reduce the free-wheeling operation of the rotor, in which case the pull will result toward the side with the sticking caliper.
Sticking/stubborn caliper pistons can be caused by corrosion in the piston bore as the result of moisture contamination, or following a brake pad replacement after the brake pads have been allowed to severely wear. If the vehicle was operated with thin pads for an extended period, the caliper piston travel distance within its bore has been limited, with possible rust/contamination building up in the unused area of the piston bore. Once the new pads have been installed, this causes the piston(s) to be further retracted, now travelling win a non-smooth area of the bore, potentially resulting in the piston being slowed down or stuck in the contaminated bore area.
If a vibrational complaint involves the problem occurring during braking, the most likely cause is a warped brake rotor, causing the pads to bounce away from the uneven rotor surface. Brake rotor warpage can result from various causes, including brake rotor overheating, lateral or radial runout, sticking caliper pistons and even improper wheel fastener torquing.
Many passenger cars today feature thin-hat rotors that are easily distorted if the wheel fasteners are unevenly or excessively tightened. This is another reminder that a calibrated torque wrench should always be used, especially when installing alloy wheels. Avoid the use of impact wrenches during wheel installations, and always tighten to factory specifications, following the correct tightening sequence.
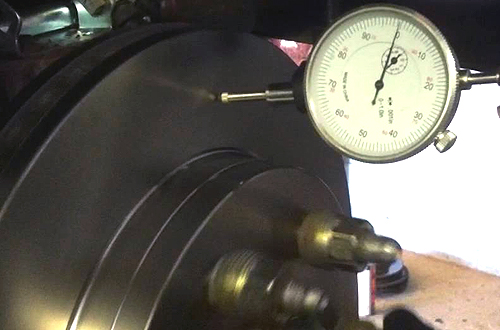
Check brake rotors for lateral runout which causes the rotor to wobble as it rotates, kicking the brake pads in and out during braking, resulting in pedal bounce. When checking lateral runout, the rotor must be secured to the hub with all wheel fasteners (not only two or three wheel nuts or bolts), with fasteners torqued to specification.
Before replacing an otherwise acceptable rotor, mark the orientation of the rotor to the hub. Remove the rotor and reposition it to the hub in the next clock position and re-check for runout. You may have a stack-up of runout tolerance between the rotor and the hub. If you start to see an improvement, reposition the rotor to the next clock position and re-check. It may be possible to find that “sweet spot” where hub runout and rotor runout cancel each other out.
A noise complaint has the potential for covering quite a lot of ground. Try to obtain more detailed information from the customer. What type of noise do you hear? (clicking, groaning, grinding, popping, whirring, whistling, chirping, banging, etc.). When do you hear the noise? (while starting the engine, while cruising, during braking or turning, or when braking).
Worn front wheel bearings will typically produce a grinding or clicking sound. Worn or damaged upper strut bearings will typically produce grinding, squeaking or popping noises best heard during slow turns. Worn or dry CV joints will cause a clicking noise, usually experienced during a slow turn.
If the vehicle features front-wheel drive and the rear suspension features a Watts link, it’s not uncommon for a worn center bushing to be worn out, which will result in a banging noise as the vehicle is driven over bumps or uneven road surfaces. This is often misdiagnosed as involving loose or worn-out rear shocks/struts. A worn-out watts link won’t really cause any major drivability issues, but the resulting banging noise can be quite nerve-wracking, making the vehicle owner concerned about a major problem.
A quick check when trying to isolate a suspension noise is to unload the suspension (car jacked up or on a frame lift) and whack the center of the tire tread with a large hammer, while listening (and feeling with your hands) for noises at control arms, sway bar links, wheel bearings, etc. This basically allows you to attempt duplicating the tire hitting a pothole. This old-school technique can often let you determine a worn suspension component.
A shaking complaint by the customer in somewhat ambiguous, since the issue may involve a vibration or a shake. Potential wheel imbalance is an obvious starting point. A road test will help to confirm this. If you suspect a wheel imbalance, and you check the wheels on a balancing machine and find no issues, consider a road force variation issue, where the construction of the tyre has isolated hard spots. This may be verified and remedied by using a balancing machine that features a road force simulator.
Other potential factors might include a driveshaft imbalance. Inspect the driveshaft for a missing wheel weight and check for worn front and rear universal joints. Also inspect for a bent or dented driveshaft. If the vehicle features rear-drive and a solid axle housing, check the pinion angle. If the axle assembly pinion angle has been moving vertically, this changes the driveshaft angle, which could explain a shaking or vibrating issue. If the rear suspension features leaf springs, inspect the spring mounts and spring pad U-bolts for wear and looseness.
Severely worn shock absorbers prevent controlled vertical wheel travel, reducing correct tyre to road surface contact pressure, resulting in a floating sensation at highway speeds. In combination with speed-related vehicle air resistance, this can give the driver a feeling of a light, wandering condition. Worn shocks/dampers will allow over-travel of the suspension, allowing excessive body lean in both lateral and longitudinal planes.
The reduction of damping and spring harmonic control leads to not only directional wander and body lean during cornering but nose-dive during deceleration and braking, as well as noticeable wheel hopping, since a failed shock is not able to control suspension spring oscillation. While signs of hydraulic oil leakage are indications of wear, internal pistons and seals may be worn with no observed fluid leaks.
Since poorly performing or worn-out shocks/struts don’t control the suspension properly, this creates a domino effect by placing greater loads and stress on other suspension parts such as control arm bushings, springs, anti-roll bar bushings, lateral links, etc.
Worn steering system components, such as tie rod ends, drag links, steering gears, rack mount bushings, worn or loose pitman arms or idler arms, pitman arm or idler arm mountings are all suspects when inspecting for a wandering complaint.

Loose or worn wheel bearings will result in excessive lateral wheel play, easily contributing to a wander issue.
Moisture contamination is one of the primary causes of roller or ball bearing failure. Moisture leads to bearing overheating, deterioration of bearing grease and corrosion and bearing noise.
A drone or whirring noise can often be misdiagnosed as a wheel bearing issue, where uneven tire tread wear may be the actual cause. Noises tend to travel and may be generated by a wide range of chassis components, sometimes making pinpoint diagnosis difficult.

The Steelman Chassis Ear kit
Chassis ears, a somewhat generic term for equipment that allows you to monitor noise and vibration, can be very useful for pinpointing issues with a wide variety of components where you simply attach the transmitters to the area or component you wish to test. Attachment methods vary, depending on the mounting surface.
Each transmitter is usually identified with a number (1, 2, 3, 4), with corresponding illuminated buttons on the receiver. While the receiver features transmitter-related buttons and a row of noise-intensity LED lights that provide a good visual signal, it’s best to also plug in a set of earphones that allow you to hear noises.
You simply take the vehicle for a test drive, press the transmitter desired and listen for noises. This makes it easy to compare, for example, left and right wheel bearing noises on the same axle.
For example, if you suspect a wheel bearing problem, in addition to monitoring both front wheel bearings, you can attach a third transmitter to the transmission and a fourth to the differential.
Noises and vibrations tend to travel, and since the human ear might suspect a wheel bearing, the noise may actually be coming from another source such as the transmission. Using this type of monitoring system helps you to pinpoint the area of concern.
