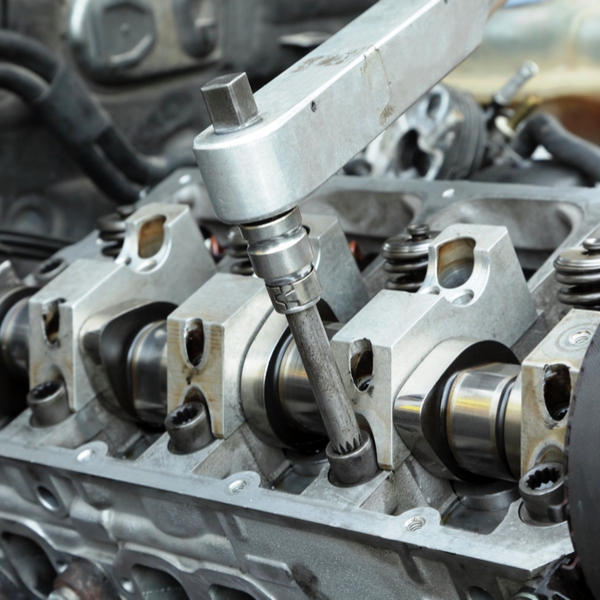
We have all encountered the following scenario at some point in our careers: a customer presents a vehicle on which the cylinder head gasket had been replaced with an OEM replacement X-number of months ago, and which now displays unmistakable signs that the replacement gasket had blown again.
The customer maintains that the engine did not overheat at any point from then until now, and that the cooling system had not lost any coolant during this time. Moreover, to prove that the job was not performed by a backyard mechanic, the customer presents a professional invoice that clearly shows all the required engineering and tests had been performed, and that the water pump, thermostat, and radiator hoses were replaced at the time the original gasket was replaced. The radiator was also chemically cleaned, and there are no historic fault codes present. So what went wrong?
While there are many possible things that could have gone wrong, in our hypothetical example however, the most likely cause is the fact that the cylinder head was not torqued down properly. Thus, in this article, we will take a closer look at how bolts work, what to keep in mind when tightening critical bolts, and more importantly, why bolted joints fail, starting with defining some common terms that are often used but not always understood, such as-
“Preload” is a common term that describes the tension, or clamping force a bolt exerts across a joint when the bolt is tightened. As a practical matter, the total clamping force across an unloaded bolted joint, such as a cylinder head being clamped to an engine block, is assumed to be equal and opposite to the preload of all the bolts. Therefore, if the specified preload is not applied to all the cylinder head bolts equally, it is almost certain that one or more issues such as fatigue failures of one or more bolts can occur, or vibration can cause one or more bolts to loosen themselves, leading to a failure of the joint.
Proof load is always expressed as a unit of force, such as Newtons (N), or pound-force (lbf) and as such, it is one of three mechanical properties that define the overall tensile strength of a bolt, the other two properties being yield strength, and ultimate strength.
Essentially, “proof load” refers to the maximum allowable tensile force a bolt can endure without that bolt suffering plastic deformation. Put in another way, the bolt must remain in its elastic phase when a specified proof load is applied to the bolt. On critical engine and suspension bolts, the proof load typically ranges from 85% to about 95% of the bolts’ yield strength.
Yield strength refers to the tensile force that must be applied to a bolt in order to bring about a specified amount of permanent deformation in the bolt. In most cases, the specified deformation is limited to about 2% of the length of the bolt.
Ultimate strength refers to the maximum tensile force a bolt can endure without breaking.
As a practical matter, all of the above can be applied to conventional engine bolts that merely had to be tightened to a specified torque value to supply the required clamping force in engines that did not consist of different materials, i.e., both the engine block and cylinder head(s) were made from cast iron.
On these engines, all parts of the engine expanded at the same rate when they were hot, and contracted at the same rate when they cooled down. In practice, this meant that if the correct torque value were applied to, say, all the cylinder head bolts, the bolts would each have stretched sufficiently to supply the clamping force required to reliably seal the gasket against both the cylinder head and the engine block.
It should be noted that even though conventional bolts stretched somewhat during the tightening process, their yield strength was never exceeded, which meant that these bolts regained their original length when the preload was removed. For this reason, it was possible (and safe) to reuse conventional cylinder head bolts several times unless they were visibly corroded, pitted, or otherwise damaged.
However, new engine designs that used disparate materials, such as cast iron for the engine block and aluminium for the cylinder head(s), meant that conventional bolts could no longer hold these engines together, since cast iron and aluminium expand and contract at vastly different rates. Thus, to address the problem with differential expansion/contraction rates, engine designers were forced to develop bolts that could be preloaded to their yield strength without breaking; these bolts being known as-
As with conventional bolts, torque to yield bolts are also tensioned until they deform, but with the major difference that torque to yield bolts are tightened until they are permanently deformed, which from our perspective as mechanics, is the most important characteristic to keep in mind, and here is why-
When a torque to yield cylinder head bolt, or for that matter, any other critical torque to yield engine bolt is tightened, it undergoes two important phases, these (for our purposes) being the-
Elastic phase
In this phase, the bolt is stretched as torque is applied to it, but should the torque be removed the bolt will return to its original length. It is important to remember that in the elastic phase, the bolt will not provide sufficient clamping force to hold the cylinder head down reliably.
Plastic phase
As the load is increased to the bolt, it undergoes a plastic phase, which means that the bolt is stretched to a point from which it cannot regain its original length should the load on it be removed. It is in this condition that the bolt supplies the required clamping force to hold the cylinder head down securely.
The dividing line between the elastic and plastic phases is called the yield point, hence the term, “torque to yield” bolt. Note that this dividing line is a function of the combined effects of several factors, including the torque being applied to the bolts, the material the bolt is made of, the presence (or absence) of coatings, plating, or lubrication on any part of the bolt, the pitch angle of the thread, as well as the diameter of the bolt.
All of the factors listed above, in addition to some that are not listed, have been incorporated into something called the “Nut Factor”, which is commonly expressed as “K” in engineering speak. However, we need not delve into the complexities of calculating the nut factor here; suffice to say that if a technician uses a properly calibrated torque wrench and angle indicator to tighten down a cylinder head, it is unlikely that the yield point of the bolts will be exceeded.
Nonetheless, should the yield point of a bolt be exceeded, the technician will feel a pronounced “softening” of the load, almost as if the threads have been stripped off the bolt. At this point, the bolt is over stretched (if it does not break first) and most, if not all of the clamping force supplied by that bolt is lost, which brings us to the next point-
Like conventional bolts, torque to yield bolts are also tightened in a specific sequence and prescribed number of stages to prevent distortion of the cylinder head (or any other components), but with the very important difference that the initial torque setting, which is known as the “snug torque” is always relatively low. For example, a typical cylinder head tightening sequence might look like this-
NOTE: The example of a tightening procedure above is just that, an example that is intended for illustrative purposes. Always refer to the manufacturer’s prescribed procedures and specifications when installing bolts to avoid issues later on.
The purpose of applying degrees of rotation is to ensure that all the bolts are brought to their yield points more accurately than a simple torque value ever can, because a prescribed rotation takes into account the fact that only about 10 to 15 percent of a torque value results in a usable clamping force. Essentially, tightening bolts in degrees of rotation largely eliminates the effects of friction between threads and the bearing surface between the head of the bolt and the bearing washer. Applying degrees of rotation, as opposed to a torque value, also eliminates under or over tightening caused by poorly calibrated torque wrenches, since the angle of rotation is independent of the torque being applied.
As a practical matter, it should be noted that by applying degrees of rotation to cylinder head bolts, the final clamping forces achieved would generally be within 10% of the specified yield points, whereas with a simple torque value, the final clamping forces can be as much as 30% lower than required. The primary reason for the large disparities when using purely torque values involve the wide dispersion rates (also known as preload scatter) of torque values that are mainly the result of the overall coefficient of friction, which is a function of the combined friction under the bolt head and between mating threads.
In practice, torque to yield bolts that were tightened properly will hold a cylinder head down securely for the life of the engine, barring of course, disasters such as overheating of the engine, since the yield point of the bolts were designed to cope with differential expansion/contraction rates that cause relative lateral movements between components.
Having said all of the above, there are also other considerations to keep in mind when installing cylinder head bolts, the most important being-
Do NOT use taps to clean out threaded holes
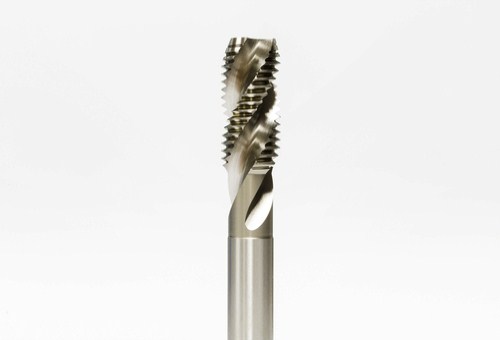
While it is critically important to clean out corrosion and other imperfections in the threads of cylinder head bolt holes in engine blocks, it is equally important NOT to use an ordinary thread cutting tap to do this. Unlike thread chasing taps, an example of which is shown above, normal thread cutting taps remove material from the threads, which could cause the treads to be stripped out of the hole when the bolt is tightened.
Also, be sure to use shop air to blow any debris out of the holes after the cleaning process, and make sure no oil or other liquids remain in the holes.
To lubricate, or not to lubricate new bolts
While there are as many opinions about this issue as there are technicians arguing either for, or against the practice, the fact is that it takes a lot more effort to tighten a dry bolt than a lubricated one.
However, the real issue involves the fact that some lubricants may work too well, with anti-seize compounds being a good case in point. Bear in mind that any threaded fastener relies on friction to remain tightened, so if a lubricant is used that allows vibration and thermal cycles to overcome that friction, the fastener will unscrew itself. Keep in mind the fact that anti-seize compounds are designed to be used on fasteners that have to be removed without breaking, which is NOT the case with cylinder head bolts.
Nonetheless, most suppliers of replacement bolts provide instructions on how to lubricate new cylinder head bolts, but in many cases, the instructions do not mention a specific lubricant, or worse, do not exclude or prohibit the use of specific lubricants. The best course of action to take in these cases is to contact the supplier for specific details on recommended lubricants, or to use a purpose-made bolt lubricant in strict accordance with the instructions provided with the product.
From all of the above it should be obvious that installing critical engine bolts entail much more than merely screwing in the bolts, and tightening them until the torque wrench clicks off. In fact, a large percentage of cylinder head gasket failures can be directly attributed to poor, or incorrect bolt tightening procedures by inexperienced mechanics, whom, if they read this, should take note of the four most common reasons why bolts, and especially cylinder head bolts, “loosen” themselves-
