
None of us will wilfully deceive a customer, but sometimes, and despite our best efforts to always be honest and upfront about a diagnosis or some other aspect of car care and maintenance, a customer just won't believe anything we tell them. Many theories try to explain why some customers behave this way. One theory has it that a disbelieving customer may have had a bad experience with a workshop, and wants to avoid another. One other prominent theory says that disbelieving customers are just ignorant of what it takes to maintain a modern vehicle.
There is no telling which theory holds the most currency, but for what it’s worth, this writer is inclined to think that some customers are just contrary by nature, and simply derive a certain amount of satisfaction from seeing us all as crooks that are out to get rich off them. Theories aside though, this article recounts the tale of one such contrary customer, and how his overly negative view of the world in general, and of mechanics, in particular, caused him to spend thousands of dollars on an entirely preventable engine repair. Let us start by introducing-
We maintain a small stock of basic parts in our reception area, including various types and grades of oil, and the first time we encountered the customer was when he bought a small quantity of single-grade engine oil for as he put it, “an Asian petrol car” from us. This was repeated about two weeks later, when he asked for 2 litres of engine oil “suitable for a tractor”, but insisted on the cheapest brand that we had available.
This pattern repeated every two to three weeks, so when the sales clerk asked why the customer did not buy oil in bulk from the local parts stores because it was cheaper that way, he simply replied that “he did not trust them to sell him the cheapest oil.”
There is much more to relate, but in the interest of brevity, we’ll just say that after some time, we discovered that the customer turned out to be an accountant who had recently made a mid-life career change when he took over his father’s sugar cane farm when his father decided to retire from active farming. The strange thing was, though, that we knew the customer’s father well enough to know that he was extremely well off money-wise, and there was thus no need for the penny-pinching his son now exhibited when he insisted on buying only the cheapest oil we carried.
Maybe the fact that the son was an accountant had something to do with it, but we never pursued the point. Nonetheless, after some more time, we managed to engage the new sugar cane farmer in conversation, and during one such conversation, he said that he enjoyed working with his hands, and maintaining the farm’s vehicles, tractors, implements, and machinery himself was particularly enjoyable.
This was fair enough because we knew the customer’s father had also done all his mechanical work himself, but we were somewhat taken aback when the son baldly stated that no garage mechanic he knew of could it as well as he (the son) could. Hence, he said, the small quantities of oil he buys were "just to keep things topped up". He also mentioned something about his "aversion to paying extortionate labour charges for oil changes that none of the engines on the farm needed".
Long story short: we decided not to argue the point, and continued to sell the customer small quantities of different brands of oil for about another two years or so. During this time, we also lost no opportunity to offer advice on the advantages of performing regular oil changes on the farm’s vehicles, as opposed to just keeping oil levels topped up with mostly incompatible oils. For his part, the new farmer also used every opportunity to ignore the advice we gave him.
One day, however, the old ex-farmer called and asked if we would mind looking at one of the farm vehicles- a 2013 Hyundai Tucson with an illuminated engine warning light, and whose engine stalled immediately after starting. The old farmer also said that he had a look himself, but could not make sense of all the “black boxes” on the car. We agreed more out of curiosity than anything else and arranged for a recovery truck to fetch the Hyundai from the farm, which brings us to-

When the Hyundai arrived, it was accompanied by its regular driver, the farm’s admin manager who used the vehicle for his daily 85 km commute to and from the farm. According to the admin manager, the vehicle had been running well enough, and without any sort of problem or issue for the two years or so that he had been using it daily.
Lately, however, the engine had become progressively harder to start, and it had been misfiring and losing a lot of power until two weeks ago when the engine light came on and it could not be started at all. The admin manager also stated that as far as he was aware, the vehicle had never been serviced since he started using it, but it was clean and seemed to be in a reasonably good condition overall nevertheless, despite the 170 000km on the clock.
Armed with the knowledge that the vehicle had not been serviced for at least two years, we began our inspection by checking the oil level. Although the level was halfway between the low and full marks on the dipstick, the oil had a shiny, jelly-like appearance, and it stuck to the dipstick without any of it dripping off. Worse, though- the top part of the dipstick showed signs of rust- a sure sign of a severely neglected engine. There was also some white oil emulsion under the oil filler cap although the engine cooling system later passed both hot and cold pressure tests.
Going by the condition of the oil, we were almost certain that the misfiring and loss of power were due to a camshaft phasing issue, but to be sure, we connected a scan tool and performed a comprehensive scan. We turned up DTC P0017 - “Crankshaft Position - Camshaft Position Correlation Bank 1 Sensor B”. There were no other active or pending codes stored.
Since we were not sure about the exact nature of the cam-phasing problem, we decided against doing anything else before reporting our findings to the vehicle’s owner. This turned out to be the old ex-farmer, who asked us to wait until he could see the engine’s condition for himself. However, soon after this phone call, the new farmer turned up and although he did not outright accuse us of lying, he did express serious doubts that dirty oil could prevent the Hyundai’s engine from starting and running.
We will gloss over the details of the discussion that ensued, much of which involved our refusal to attempt to start the engine until we had replaced the oil and oil filter. Also, and much against our safety policy, we allowed the customer to witness the oil change process for himself.
Long story short: we put the Hyundai on a lift, placed a drainage funnel under it, and removed the drain plug. Nothing came out; a thick, gooey, tarry substance plugged the hole, and when we poked a screwdriver into it, about a cupful of clear water streamed out, which explained the oil emulsion under the filler cap.
At about the same time, the old farmer, who was the vehicle’s actual owner, also arrived, and being the owner, he was decidedly upset about the extent of the neglect of his property he saw. Nonetheless, he permitted us to do whatever we thought was necessary, short of replacing the engine, to get the Hyundai running again. This blanket instruction included permission to remove and disassemble the engine to get the gunk out of it if we thought that was necessary.
This writer had done just this several times before on 3.7L Jeep Pentastar engines that ran on mineral oil because their owners thought the required synthetic oil was too expensive. Thus, knowing a) what such a job entails, and b), that reassembling any modern engine without rebuilding it to industry standards with new parts is an exceedingly bad idea, we chose an easier way. Here is-
We left the vehicle on the lift and rigged up a couple of transmission jacks under it. We placed a suitably sized container under the oil drain hole on one jack and fixed a couple of electric heaters to the other jack to heat as much of the sump and engine block as possible. We also removed the oil filter, which turned out to be plugged with the same jellified oil we saw on the dipstick. We switched on the heaters and carried on with other work.
About an hour later, we noticed that the jellified oil had started to melt, and was dropping out of the drain hole in large-ish clumps. By late afternoon, the entire engine was hot, and the gunk had stopped dripping from the sump. We surmised that the sump was now empty (while hoping the oil pump and oil pick-up tube were also empty) so we replaced the drain plug, fitted a new oil filter, and refilled the engine with 10W-30 synthetic oil.
We were not at all sure that the engine had not sustained damage to the crankshaft and bearings, so lowered the vehicle to the ground, disabled the fuel system, removed the spark plugs, and replaced the oil pressure sender switch with a mechanical oil pressure gauge so we could monitor the actual oil pressure during cranking. We were wary of starting the engine because at that point, we could not determine whether (or not) there was any mechanical damage present.
Then, hoping for the best, we cranked the engine for few revolutions to listen for knocks, thuds, or other signs of damage. We could not hear anything untoward, so we cranked the engine to check for oil pressure, which by some miracle, stabilised at 1.6 bars after about 20 seconds of cranking. So far so good, so we reconnected everything we disconnected, replaced the spark plugs, enabled the fuel system, and tried to start the engine. Here is-
The new farmer was still hanging around by this time, so when the engine started but died again almost immediately, he lost no time telling us that "He could have told us it was something else and that dirty oil had nothing to do with the problem". By this time, we'd had enough of him and politely asked him to leave, since it was already past closing time.
The first thing the next morning, we started the Hyundai again and found that we could keep the engine running by manipulating the throttle pedal. The engine ran, and although it misfired badly, we kept it running for long enough to build up some heat to see if the clean oil would flush at least some of the gunk out of the VVT solenoids and actuators.
There was, however, no improvement after about 15 minutes, so we shut the engine down to drain the oil again to see what came out of the engine. The new oil looked like treacle, but there was no visible water or lumps of gunk present, so we replaced the oil filter again, and refilled the engine with new oil.
When we started the engine again, it ran without the need to manipulate the throttle pedal as much as before. Although the engine ran extremely poorly, the oil pressure was stable at just over 5 bars, so we allowed it to warm up to operating temperature. We were still not sure exactly what the problem was, so we cleared the P0017 code, and started the engine again. It ran for a few seconds before the engine light came on again, and when we checked, the P0017 code had returned.
By now, it was clear that we needed to begin taking things apart to find the root cause of the problem, so here is-
While we did not doubt that we were dealing with camshaft phasing issues, there were other possibilities to consider that may be contributing to how badly the engine was running. Since this was a GDI engine, one possibility was a severe build-up of carbon on the inlet valves, but since the engine did not run well enough to road test the vehicle, we could not run an accurate volumetric efficiency test. The only way to be sure about this, one way or the other, was to remove the intake manifold, but we were not quite ready to do that, yet.
One other possibility was damage to the piston crowns and valves caused by low-speed pre-ignition (LSPI), also known as, “mega knock”, a little known phenomenon that afflicts many DGI engines. LSPI is caused primarily by how fuel and air mix in DGI applications, but the most important things about it is that it is generally not detected by current knock-sensing systems and that it is several times more destructive than "normal" spark induced knock. It is perhaps worth noting that while both Hyundai and KIA have released engine management software updates to reduce the incidence of LSPI on their GDI engines, the condition has largely not been resolved on their GDI engines.
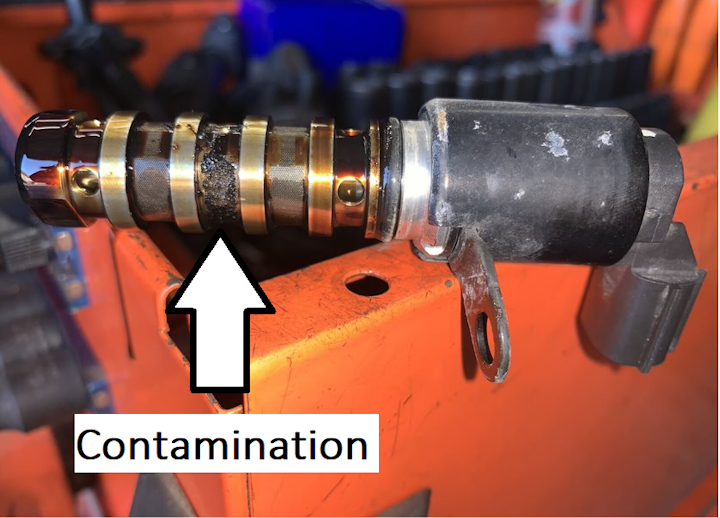
So, to eliminate piston damage as a possible contributing factor, we checked the piston crowns with a borescope, but apart from some carbon build-up, we found no damage to the pistons. Next, we removed the VVT oil control solenoids, and what we saw on the exhaust cam solenoid was similar to this example -
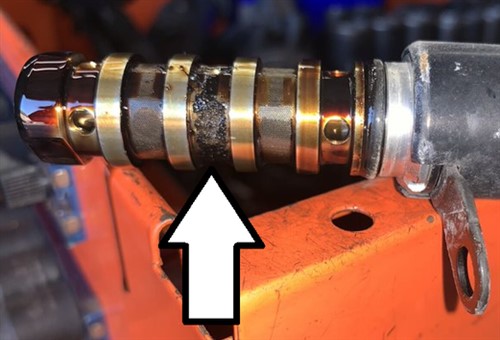
Image source: https://img.vehicleservicepros.com/files/base/cygnus/vspc/image/2021/03/MA0421_Garage_04.603e513c4844c.png?auto=format&w=720
The white arrow shows that the oil filter screen was completely blocked by a hardened crust of carbonised oil. The situation was similar on the intake solenoid, so instead of wasting time trying to clean out the solenoids, we simply replaced them with OEM parts.
The result was not encouraging. Instead of fixing the cam-phasing issue, the engine ran almost as badly as before, so to check the condition of the camshaft actuators, we connected a scan tool to obtain some live data on the actual camshaft positions. This is what we found for the exhaust camshaft-
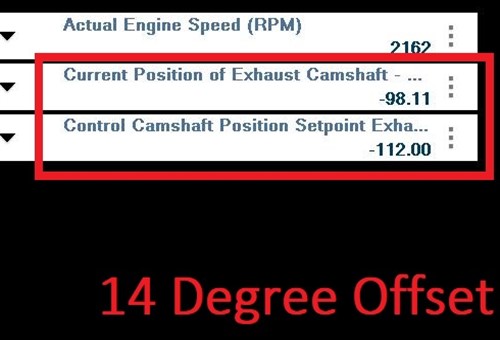
Image source: https://www.vehicleservicepros.com/service-repair/the-garage/article/21212320/diagnosing-a-neglected-engine#&gid=1&pid=2
As shown here, there was a severe offset between the exhaust camshaft’s actual and desired positions, but based on the condition and tension of the timing chain, it was unlikely that the chain had skipped a tooth, and therefore, the problem had to involve the camshaft actuator. However, our initial scan told us nothing about the difference between the actual and desired correlation between the intake and exhaust camshafts because there were several things we were not sure of at this point, such as-
Our main problems at this point were the facts that-
Therefore, by buying a two-day subscription to an official Hyundai resource, we discovered that the exhaust camshaft could rotate from -98 degrees to -71 degrees, with the setpoint being -112 degrees. Observant readers will notice that all values are negative, but with some more determined digging, we discovered that, on this engine, the maximum retarded position for the exhaust camshaft is -71 degrees. Thus, all we were sure of was that the exhaust camshaft could be phased for a maximum of 41 degrees.
Based on this rather expensive information, it was clear that the exhaust camshaft was not returning to its setpoint, or base setting. However, because the camshaft was not responding to control inputs, we could not determine if it was in an advanced or retarded position, simply because the engine had no timing marks against which to check the exhaust camshaft’s actual position with any degree of accuracy or certainty.
If the offset between the exhaust camshaft’s actual and desired positions were bigger than 14 degrees, we could maybe have worked out a way to determine if it was advanced or retarded, but since we had spent almost two entire workdays on this neglected engine, we decided to go for an easier option, instead. Here is-
Since none of us had ever dismantled and cleaned or repaired a Hyundai camshaft actuator, and because we did not of anyone else who does that, we simply decided to replace both camshafts and actuators with new OEM parts. Since we had some time left on our subscription, we downloaded the relevant repair/service information, and sent off an order for the very expensive camshafts, along with a new timing chain and all its associated tensioners, guides, and sprockets- all of which arrived three days later. We need not delve into the specifics of the camshaft and timing chain replacement process here, beyond saying that it took two technicians an entire workday to complete.
With everything buttoned up, all wiring connected and double-checked, we re-installed the oil pressure sender switch, replaced the air filter and the spark plugs with new ones, and changed the engine oil and filter again. We also debated whether or not adding an engine flush additive to clean up the engine was a good (or bad) idea and decided that it might not be a good idea at this point, because the strong detergent might loosen clumps of carbon and/or sludge in the crankcase that could block oil passages. As a precaution, we disabled the fuel system before cranking the engine to ensure that the new camshafts and actuators were supplied with oil.
Hoping for the best but expecting something else, we started the Hyundai, and against all expectations, it fired up immediately and ran as smoothly as the proverbial Swiss sewing machine. Despite that, and just to be sure that everything was working as intended, we took some live data from the camshafts. Here is what we found-
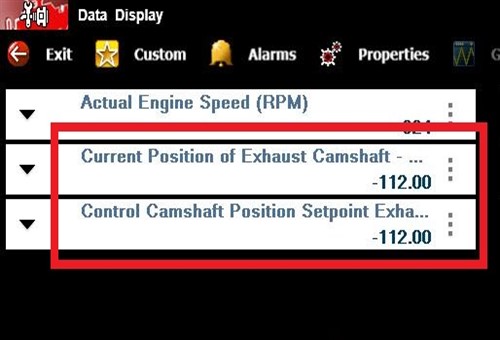
Image source: https://www.vehicleservicepros.com/service-repair/the-garage/article/21212320/diagnosing-a-neglected-engine#&gid=1&pid=5
This shows that with the engine running at idling speed, the actual and desired exhaust camshaft positions coincided exactly, so we also checked the actual and desired positions of the intake camshaft-
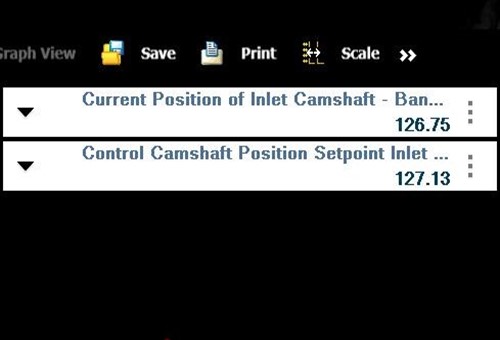
Image source: https://www.vehicleservicepros.com/service-repair/the-garage/article/21212320/diagnosing-a-neglected-engine#&gid=1&pid=5
As shown here, the difference between the intake camshaft’s actual and desired positions was only 0.38 degrees, which we thought was not enough to be concerned about, unless the difference increased after a test drive, which it did not, as it turned out.
Thus, we cleared the P0017 code (again), hooked up a scan tool to collect live data for a volumetric efficiency test, as well as fuel trims and the operation of the oxygen sensors and catalytic converter. This was not to pad the repair bill, but we felt that since the new farmer did not believe us when we told him about the advantages of regular oil changes, we felt we needed to cover all our bases should something fail that we did not work on.
In short, a longish test drive did not turn up any major issues. No new trouble codes appeared, there were no mechanical noises, and the engine performed without a hiccup. The volumetric efficiency test returned a respectable result of 89% at WOT at 3500RPM, and the idling quality remained stable- as did the oil pressure.
The only concern we had involved the fuel trims that fluctuated in a very narrow, 3%-wide band on either side of zero. This was clearly abnormal, but since the volumetric efficiency test ruled out any major breathing issues, we checked the exhaust gas with our 5-gas analyser and found the exhaust stream contained about an average load of fuel-derived hydrocarbons. This ruled out excessive fuelling, so the excessive carbon monoxide, carbon dioxide, and oxygen counts we found were almost certainly due to the engine combusting excessive amounts of oil.
Put simply, combustion on this engine was not perfect, hence, the small fuel trim corrections. In our opinion, the poor combustion was almost certainly due to excessive wear of piston rings and valve guides caused by poor lubrication, but short of rebuilding the engine, there was nothing we could do about that, which leaves us with this-
So there you have it: a long sorry tale about an avoidable repair that took three full workdays to complete and cost the vehicle's actual owner, which was the old farmer, just over $8 000.
We felt a bit guilty about the cost of the repair, but then again, we cannot be responsible for what our customers choose to believe, or not believe, as the case may be when we give them sound advice. Nonetheless, we were left feeling that maybe we could have done something differently, but what exactly we could have done differently was not, and is still not easy to pin down even several years later.
So here is a question: what would you have done in this situation? Would you have refused to accept the job unless you could rebuild or replace the engine to deliver a complete and comprehensive repair that you could guarantee? Given the customer’s propensity to neglect his vehicles’ care and maintenance, would that necessarily have been the right thing to do? What do you think?
