We all understand the importance of a structured diagnostic strategy, and particularly when diagnosing electrical issues. We also understand that any well-thought-out diagnostic strategy should ideally be based on objective test results and that all electrical tests and measurements should be compared to reliable service information- where service information is available.
However, what to do when you are faced with a problem that the vehicle manufacturer had not foreseen, and you have to rely on your “gut-feel” and instinct as much as on your knowledge of electrical theory to resolve such a problem because there is no repair information available for this particular problem? This article recounts just such a problem and its resolution, but before we get to specifics, let us start by stating-
The problem arrived in the form of a 2007 Chrysler minivan with its wipers running at full speed, despite the wiper switch being in the “OFF” position. There were also several illuminated and flashing warning lights on the dashboard, the fuel gauge needle was sweeping back and forth across the instrument, and the seatbelt warning chime was chiming away loudly- even though the van's owner was wearing the seatbelt, and all other seat belts were clipped into their buckles.
The van’s owner was also highly irate, because he had paid diagnostic fees at three other workshops, including a dealer workshop, over the preceding week, and all told him that-
Since the van’s owner was also insisting that he refused to be “ripped off” again by yet another bunch of incompetents, this was no time to make hasty promises and/or diagnoses, even though the previous diagnoses and prognosis may just be correct in all respects. The fact of the matter was, however, that neither this writer, nor his resident diagnostician had ever seen anything quite like this particular combination of symptoms in their nearly fifty years of (combined) experience, and it was unlikely that many other mechanics had, either.
Nonetheless, this was also no time to claim ignorance of issues like this, so we placated the van’s owner by promising to supply him with a vehicle while his van was in our care, and asked him for some background information about the problem. In the interests of brevity, we’ll only recount the most salient points here-
According to the owner, the van had always started and ran perfectly, even after his current problems started. He also explained that since he was a sales representative for a national spice company he spent long hours in his vehicle, so he immediately noticed when the wipers began to “twitch”, as he put it, even though they were switched off. This started happening about three weeks ago, but the “twitching” soon turned into full wiper operation for a few seconds before stopping again. This happened at unpredictable times and although he tried to discern a pattern, or link the issue to certain operating conditions, ambient temperatures, or other factors, the un-commanded wiper operation got steadily worse and more unpredictable.
About a week later, he noticed some warning lights on the dashboard flashing on and off until they came on and stayed on, which was followed by the seat belt chime, erratic locking and unlocking of the driver’s door, and the erratic behaviour of the fuel gauge. The only other thing he could tell us was that he'd had the battery replaced about two months before and that the previous workshops he'd been to all agreed that the battery was fine and that there were no charging system issues present. Sadly, though, he could not provide us with the diagnostic reports he'd paid for at the other workshops, so we had to begin our diagnostic process from scratch, and here is-
To be on the safe side, we checked the manufacturer’s recommendations and confirmed that the battery was indeed of the correct type, rating, and capacity. The terminals were also clean, tight, and free of corrosion, and some testing with both a multimeter and a digital storage oscilloscope showed that there was no AC ripple current present, which eliminated at least one possible cause of some of the symptoms.
Next, we connected our Chrysler-specific DRB3* scan tool and initiated a process to scan all control modules on the van to extract all stored trouble codes. The results were rather surprising.
*Chrysler uses two distinctly different scan tool systems on different Chrysler platforms, depending on whether they are older non-CAN or the newer CAN communication systems. Visit this resource for more details on Chrysler scan tool software options.
We found at least twelve trouble codes, and all were UXXXX codes. However, in this instance, while all the codes related to loss of communication between control modules, all but two related to different interior control modules; the two codes that related to the same control module implicated the central gateway module, which is a module that handles all communications between diagnostic tools and all other control modules. There were no codes relating to engine, fuel, ABS, or transmission control modules, which bore out the van owner’s statement that he had not experienced any driveability issues with the vehicle. The presence of a gateway module was bad news for us, but before we explain why, consider this schematic of the interior communications bus on this particular vehicle-
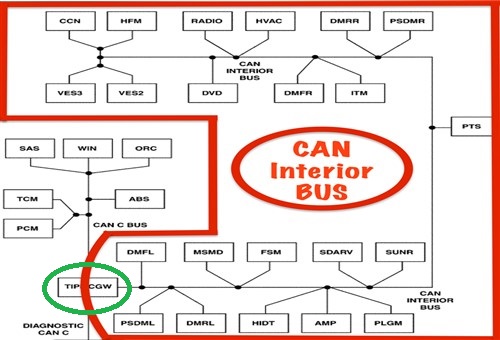
Image source: https://www.searchautoparts.com/motorage/drivability/getting-put-through-diagnostic-wringer-can-interior-bus-issues?page=0,0
In this diagram, the red outline includes all the modules that control interior functions, but note the module circled in green. This is the gateway module, and while the DLC (Data Link Connector) is not shown here, this gateway module forms an effective barrier between a scan tool and all the control modules included in the red outline.
As shown here, all the interior modules are connected both to each other and to the gateway module, so when a system like this is scanned, only faults/fault codes that are reported to the gateway module are accessible to a scan tool. In the normal course of events, individual modules cannot be accessed for detailed analysis and interrogation unless one finds a wire or circuit that is common to all implicated control modules, and even then, it is never certain whether one is testing a circuit, or a control module, which brings us to-
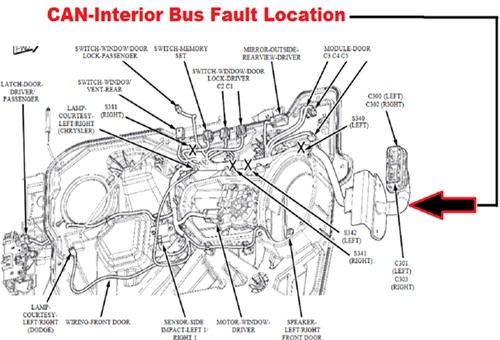
Image source: https://www.searchautoparts.com/sites/www.searchautoparts.com/files/images/ma1217-figure-2.png
At this point, we had no easy options. We could replace the gateway module because it might be defective, or we could replace the wiper motor’s wiring harness because it has, or might have a short circuit somewhere, or, we could find a wire or circuit that is common to all implicated control modules. The last option involved disconnecting implicated control modules one at a time while trying to replicate the issue. Doing this might take a long time, but at the time, it seemed like the best way to isolate the fault(s).
We settled on the third option, but since we needed a large-scale wiring diagram, we purchased one from a third-party vendor and discovered that the easiest entry point into the interior CAN system was through the wiring section between the "A" pillar and the driver's door. The relevant section of the wiring diagram is too big to reproduce here, but it showed fine details of the connections between the driver's door module, and all other implicated control modules. Moreover, this seemed like a good place to start the diagnostic process since the van's owner mentioned the erratic locking and unlocking of the driver's door.
Therefore, we carefully removed the insulation around the section of wiring between the "A" pillar and the door (refer to the drawing above), and the problem jumped out at us. It turned out that one wire, (a grey wire with a white trace) had overheated, and by wiggling this wire at the spot where the discolouration of the insulation was the worst, it was possible to replicate all the symptoms when the ignition was turned on. This wire was clearly hanging on by just a few strands and under some conditions, its continuity was lost momentarily, which in turn, interrupted communications between all control modules that shared this wire.
To test this theory, we traced this wire on the wiring diagram, and it turned out that this was not only the CAN negative wire, it was also shared by all the interior CAN modules. However, this did not explain the random cycling of the wipers or any of the other symptoms. At the time, we reasoned that a loss of communication over the interior CAN would cause the wipers not to work, as opposed to making them work randomly.
Nonetheless, since we could not explain this behaviour we researched the problem and found that on Chrysler minivans up to 2008, as this one was, a temporary loss of communication between any two or more control modules on the interior CAN would not only cycle the wipers, it would also cause all of the other symptoms we observed. We could not, however, find an explanation of the actual mechanisms of this phenomenon, but since this solution was posted on a discussion forum by a certified Chrysler mechanic in the USA, we took him at his word and repaired the damaged wire.
The wiring repair and clearing all the stored trouble codes resolved the issue, and while we felt a profound sense of relief that resolving this issue was easier than we had thought, our sense of relief was short-lived because two days later-
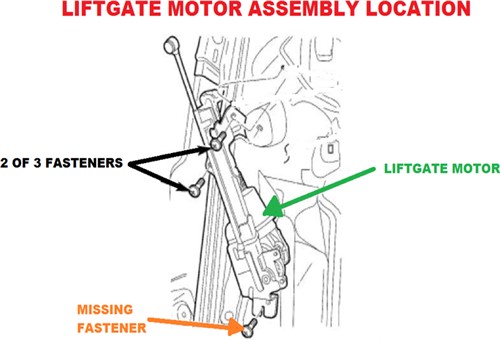
Image source: https://www.searchautoparts.com/sites/www.searchautoparts.com/files/images/ma1217-figure-4.png
We will gloss over our sense of embarrassment when the Chrysler van came back, but it is worth mentioning that two things were different this time. The first was that the van’s owner was not just upset- he was livid, and the second thing was the fact that the symptoms now only appeared while driving on rough or uneven roads.
Placating the van’s owner was somewhat more difficult this time, but we managed it by arranging another rental vehicle for him and promising that we would fix the problem right this time at no cost to him. That done, we took the van in hand again.
The first thing we did was to check that our original wiring repair had not come undone, but everything seemed in order. Next, we scanned for trouble codes and extracted largely the same codes we found the first time. To give ourselves some time to think this problem over, we took the vehicle on a road test and sure enough, the wipers cycled, the warning lights started flashing, and the seat belt chime sounded every time we drove over a speed hump in the road.
Returning to the workshop, we were no closer to solving this riddle. However, re-examining the wiring diagram we had purchased earlier it dawned on us that the damaged grey and white wire we repaired the first time might be damaged again, but elsewhere. Thus, we left the ignition on and opened and closed all the doors, bonnet, and tailgate manually to see if we could replicate the problem. We wiggled every bit of wiring we could see, but nothing we did produced the symptoms until the diagnostician pressed the button that opened the tailgate electrically.
All the symptoms appeared every time the button was pushed, so we opened the tailgate by hand to see what would happen. As it happened, nothing happened- no symptoms appeared no matter how many times the tailgate was opened by hand. However, we did notice that the lift motor seemed to be moving rather a lot when we opened the tailgate by hand, and a closer inspection showed that the bottom retaining screw* had fallen out, and was missing. The other two screws were loose, so we tightened those and replaced the missing screw, but the symptoms appeared again when we opened the tailgate via its control button.
* Refer to the drawing at the top of this section.
Therefore, and remembering that all the interior CAN control modules shared the CAN negative wire, we inspected the part of the harness between the lift motor and the “D” pillar. Sure enough, the same grey and white wire we found damaged in the driver’s door was damaged here as well, but this time, the insulation was partly melted and fused to a blue wire, whose function we could not determine at that time.
Now the problem became clear: the grey and white wire was intermittently shorting out against the blue wire. This caused an intermittent loss of communications between the control modules when a) the excessive movement of the lift motor forced the wires to touch, and b) when the current draw in the wiring caused the damaged wiring to arc when the control button was pushed. This explained why there were no symptoms when we opened the tailgate manually; opening the tailgate by hand did not load the lift motor in ways that would cause the damaged wiring to short out, which leaves us with this-
Repairing the wiring for a second time resolved the issue for the second time, but there should not have been a second time. Put simply, we had failed this diagnostic test the first time around by not looking for the reason why the CAN negative wire was damaged in the first place.
It could perhaps be argued that we could not have known that the tailgate lift motor had lost a fastener and that its wiring would be damaged because of excessive movement of the motor. It could perhaps also be argued that since the first repair had fixed the issue, we had no reason to suspect that a second defect existed in the same wire/circuit, but such arguments are pointless.
The real point is that we had ignored clear evidence of a short circuit when we had the van for the first time. By ignoring the evidence, we put the cart before the horse, and herein lays a lesson for all of us, because in this case, the wiring diagram clearly showed the relationship between the door locks/latches and the tailgate’s lift motor.
Had we taken the time to notice this relationship, we would have recognised that the damage in the door’s wiring harness was the result of the damage to the lift motor’s wiring, as opposed to being the only problem in the circuit. We were just lucky that the damage occurred in a spot that was easy to access, and we took that as a sign that there were no other issues present.
Therefore, the moral of this story and the lesson it holds is this; don't consider a repair as complete and successful unless you verify that repair. Our failure to verify the original repair cost us both time and money, and although we gained a regular customer, our failure to do the job right the first time will likely prevent this customer from ever trusting us fully. Don’t let that happen to you.
